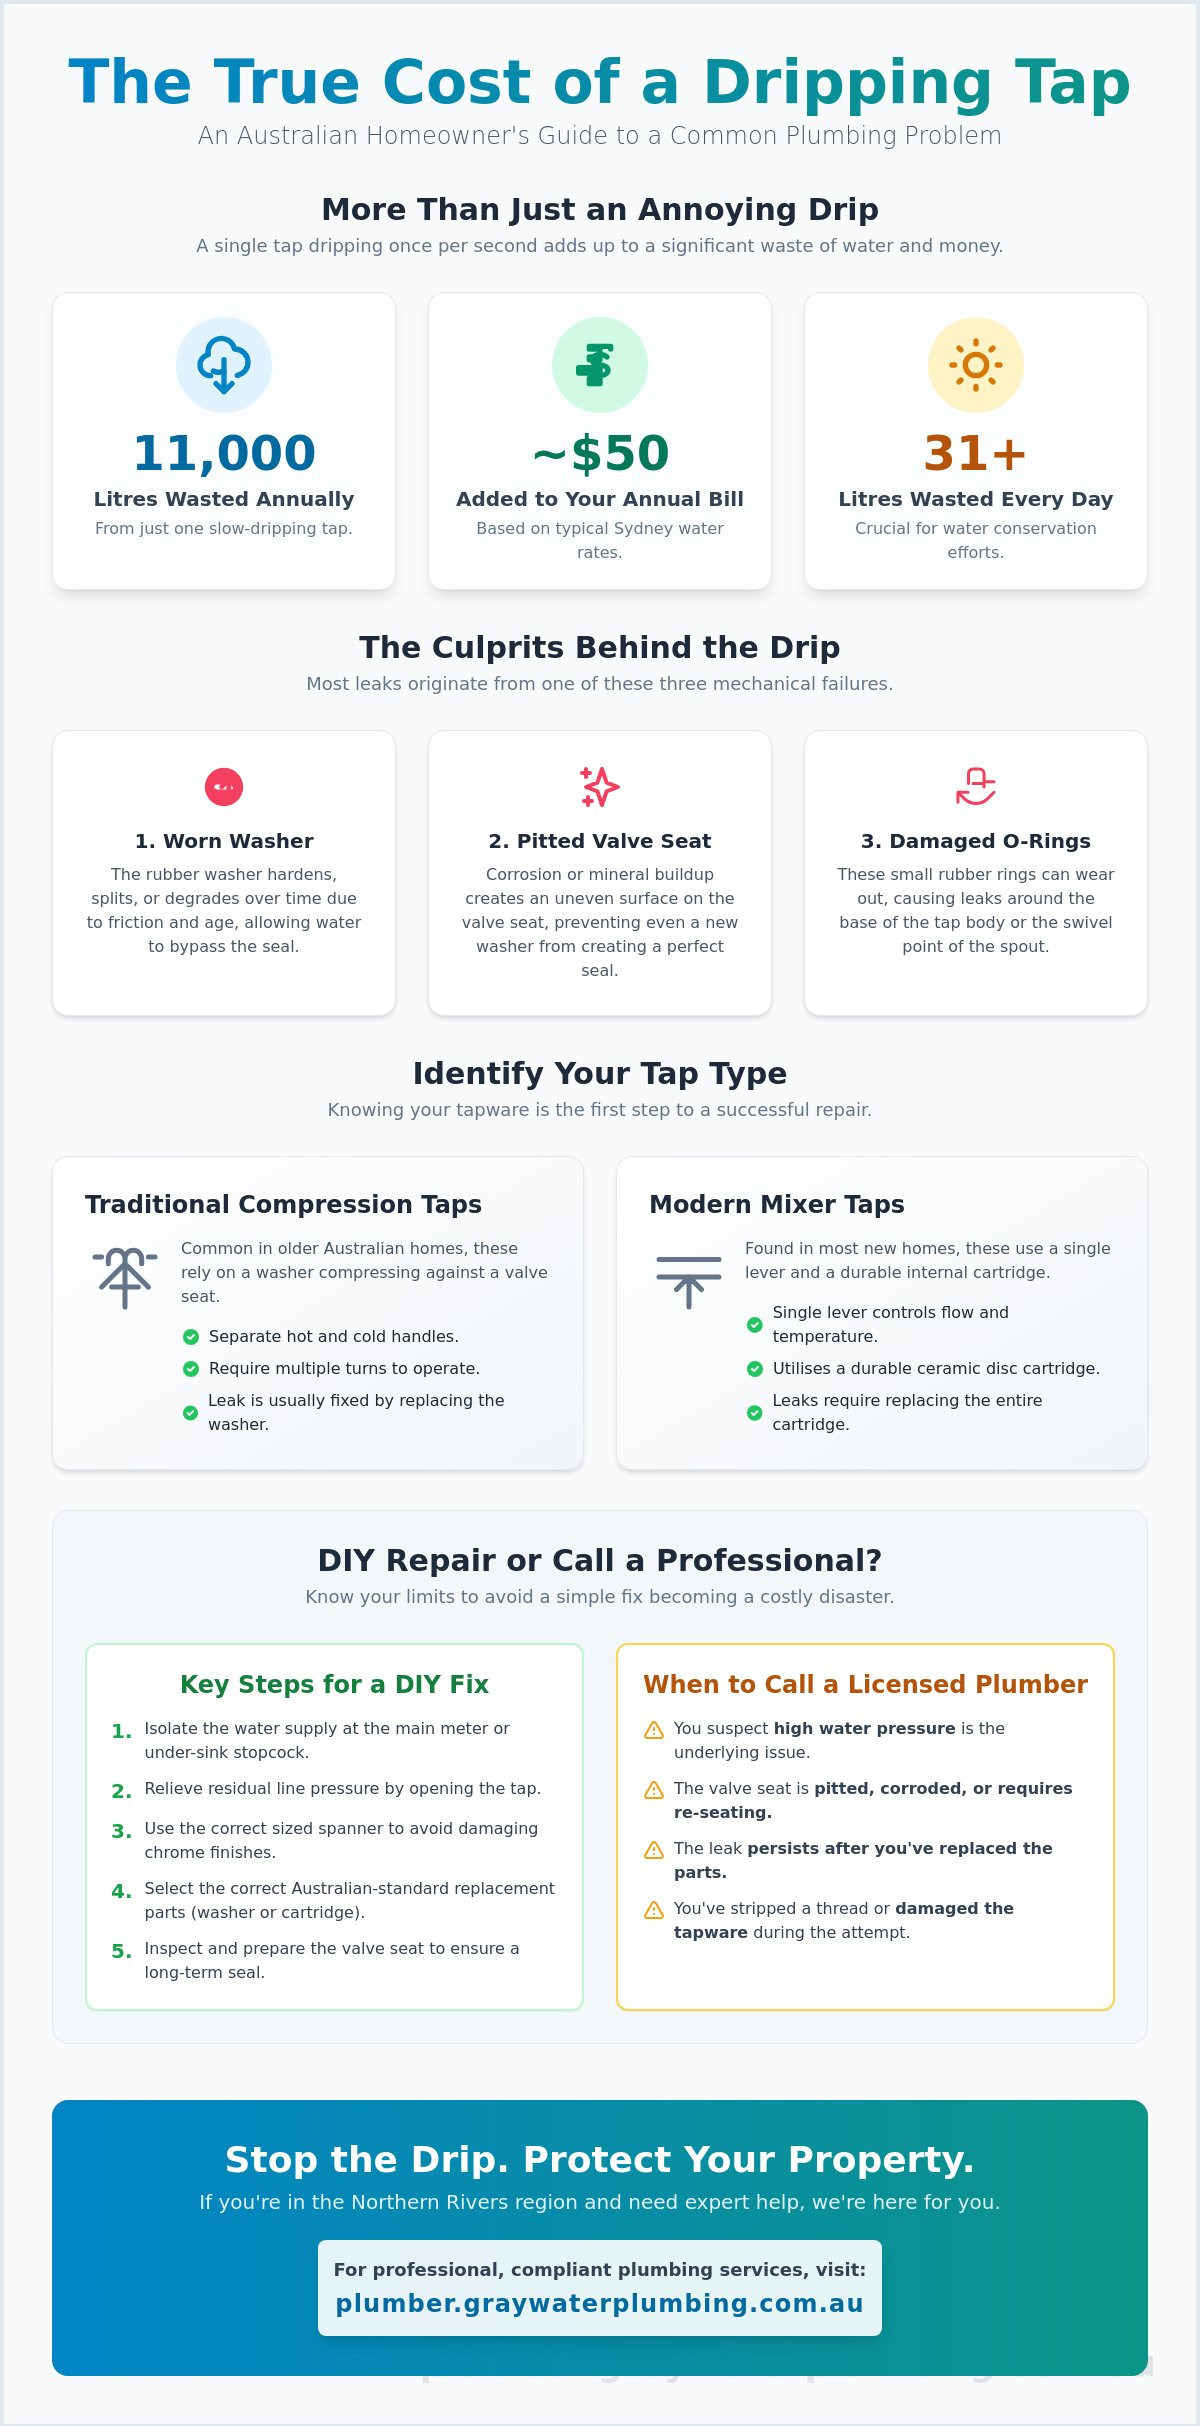
Did you know that a single tap dripping just once per second wastes approximately 11,000 litres of water every year? This is not just an irritating sound that keeps you awake at night; it is a constant drain on your household budget that can add roughly $50 to an annual water bill in Sydney. Many homeowners feel a sense of hesitation when considering how to fix a leaking tap, often worrying they might strip a thread or cause a more serious leak. It is a practical concern, as a simple maintenance task can become complex without a disciplined and systematic approach.
We believe in a methodical approach to property maintenance that prioritises transparency and quality craftsmanship. This guide provides a professional framework to help you resolve the issue with confidence and precision. You will learn the specific steps to dismantle your tapware, the importance of selecting the correct Australian-standard washers, and the technical process of preparing the valve seat. We also outline the clear indicators that suggest a job requires a licensed professional to ensure your plumbing remains compliant with local regulations.
Key Takeaways
- Identify the specific tap assembly in your home to ensure you select the correct Australian-standard replacement parts for your repair.
- Master the systematic steps of how to fix a leaking tap, from isolating the main water meter to safely relieving residual line pressure.
- Learn the technical nuances of servicing modern mixer taps, including the precise method for accessing and replacing faulty ceramic disc cartridges.
- Understand the importance of preparing the valve seat properly, a critical step that ensures a long-term seal rather than a temporary fix.
- Recognise the warning signs of high water pressure and other complex faults that indicate when a task requires a professional to maintain property compliance.
Why That Dripping Tap is Costing You More Than Just Sleep
A dripping tap is more than a midnight nuisance. While the sound is frustrating, the financial and environmental impact is the real concern for residents in the Clarence Valley. A single tap dripping at a rate of once per second wastes roughly 31 litres of water every day. Over a month, this adds up to nearly 1,000 litres. If the leak is a steady stream, you could easily waste over 2,000 litres of water per month. This unnecessary consumption reflects directly on your quarterly water rates. In regional areas like Northern NSW, where water storage levels can fluctuate, every drop counts toward local conservation efforts.
Learning how to fix a leaking tap is a foundational skill that protects your home's infrastructure. In our region, we often see accelerated wear due to the specific mineral content in the local water supply. These deposits can build up on internal components, causing friction that degrades rubber seals faster than in other areas. It is a practical problem that requires a disciplined maintenance routine to prevent long-term damage to your fixtures and pipework.
Common Causes of a Leaky Tap
Most leaks stem from three primary mechanical failures within the assembly. First, the traditional rubber washer settles into the valve seat to stop water flow. Over time, friction and age cause this rubber to harden or split, allowing water to bypass the seal. Second, the valve seat itself can become pitted or corroded. When this happens, even a brand-new washer cannot create a watertight seal because the surface is no longer smooth. Finally, damaged O-rings are often the culprit when you notice water pooling around the base of the tap or leaking from the spout's swivel point. These components are standard in different types of taps found across Australian homes.
The Cost of Delaying the Repair
Ignoring a small drip often leads to more expensive complications. Constant moisture results in unsightly mineral staining on porcelain basins and can eventually pit expensive chrome fixtures, requiring a full replacement rather than a simple repair. Beyond aesthetics, there is a risk of structural damp if water seeps behind the wall flange or under the vanity. A minor washer failure can also mask a more serious high-pressure issue. High mains pressure is a silent killer for domestic plumbing, often leading to a sudden leak detection emergency or a burst pipe. Addressing the problem early is a pragmatic way to protect your property and avoid the stress of an urgent service call. Knowing how to fix a leaking tap before it escalates ensures your home remains efficient and secure.
The Aussie Handyman’s Toolkit: Identifying Your Tap Type
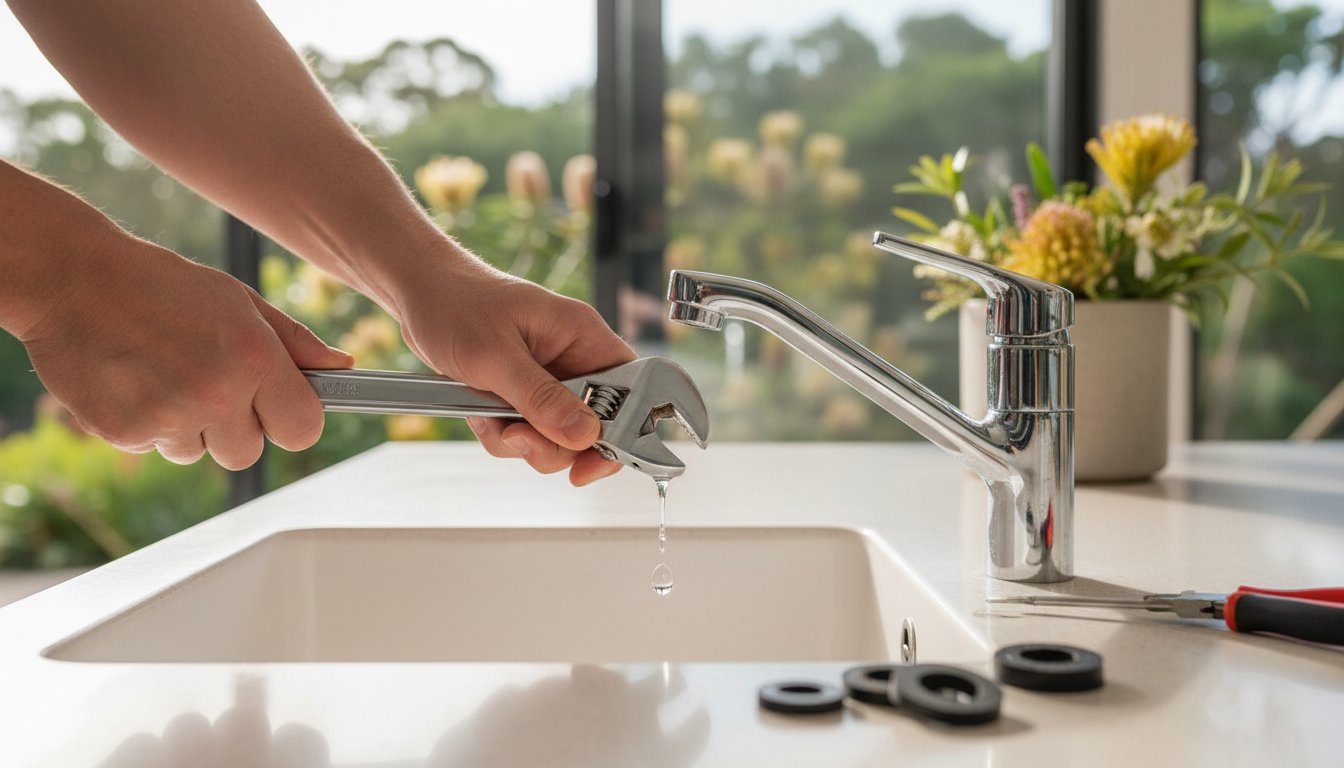
Successful property maintenance begins with the correct equipment. Before you attempt to learn how to fix a leaking tap, you must ensure your toolkit is fit for the task. Using an incorrectly sized spanner is a common mistake that leads to "rounding off" the decorative chrome nuts. Once these are damaged, removing the tap assembly becomes significantly more difficult and often requires a full fixture replacement. A disciplined approach starts with a high-quality adjustable spanner, also known as a shifter, which allows for a precise, snug fit on various hexagonal components.
You must also identify which type of tap you are working on. Traditional compression taps are common in older Australian homes; they feature separate hot and cold handles that require multiple turns to operate. Modern homes typically utilise mixer taps, which use a single lever to control both temperature and flow through a ceramic disc cartridge. While the logic of how to fix a leaking tap remains similar, the internal components are vastly different. Preparing your workspace is equally vital. Always place the plug in the drain before you start. This simple step prevents small screws, O-rings, or washers from disappearing down the pipework during disassembly.
The Essential Tool Checklist
A well-organised toolkit saves time and prevents frustration. This step-by-step guide to fixing a tap highlights the importance of having the right gear on hand. Your checklist should include:
- Adjustable Spanner (Shifter): For loosening the tap bonnet and nuts without marring the finish.
- Screwdrivers: Both flat-head and Phillips head for removing handle caps and grub screws.
- Tap Lubricant: Use only food-grade silicone grease to ensure the spindle moves smoothly and the seals last longer.
- Tap Valve Reseating Tool: This is a specialised tool used to smooth out a corroded valve seat, ensuring the new washer sits perfectly flush.
Sourcing the Right Replacement Parts
Australian plumbing fixtures typically use standard 12mm or 15mm tap washers. When you visit the hardware store, you will find various materials. Traditional rubber washers are versatile, while foam washers are often more forgiving on slightly uneven valve seats. If your tap uses ceramic discs, you will likely need a specific replacement cartridge rather than a simple washer. We recommend purchasing a comprehensive tap repair kit. These kits are a cost-effective way to secure spare O-rings and fibre washers, which often perish at the same time as the primary valve. If the internal corrosion appears too advanced for a simple DIY fix, contacting a licensed plumber is a pragmatic way to avoid further damage to your home's infrastructure.
How to Fix a Traditional Compression Tap (Washer Replacement)
The process of how to fix a leaking tap begins at your property boundary. You must locate the main water meter and turn the isolation valve clockwise until it stops. In most Australian suburban blocks, this meter is found near the front fence line, often housed in a plastic or concrete box. After the water is isolated, return to the tap and open it fully. This step is essential to drain any residual water in the pipes and relieve the pressure within the line. Skipping this can result in a sudden spray of water once the assembly is loosened.
Once the water stops flowing, you can begin disassembly. Remove the handle by prying off the decorative button to reveal the handle screw. Once the handle is off, unscrew the flange, which is the bell-shaped cover, to expose the headwork. Use your adjustable shifter to unscrew the large hexagonal nut, known as the bonnet, and remove the spindle assembly. This reveals the jumper valve and the valve seat inside the tap body. It is a straightforward task, but precision is key. Inspect the internal components for any signs of cracks or heavy mineral buildup that might impede a new seal.
The Critical Reseating Step
A common reason DIY repairs fail is the neglect of the valve seat. If the seat is pitted or has mineral buildup, a new washer won't create a watertight seal. Use a reseating tool to grind the brass surface until it is perfectly flat and shiny. This ensures the new washer makes full contact across the entire surface. Always wipe away any brass shavings with a damp cloth before reassembly. If these particles remain, they will quickly damage the new seal. This methodical approach is the difference between a temporary fix and a professional-standard repair.
Replacing the O-Ring and Jumper Valve
Inspect the spindle for a small rubber O-ring. If water leaks from the handle when the tap is on, this seal has likely perished. Replace it and apply a thin layer of food-grade silicone grease to the spindle threads. This provides a professional, smooth feel when turning the tap. When selecting a new jumper valve, brass-bodied valves are generally more durable than plastic alternatives for Australian conditions. Ensure the valve is seated correctly before screwing the bonnet back into place. Knowing how to fix a leaking tap properly involves replacing these minor components to prevent future maintenance issues.
Repairing Mixer Taps and Solving Persistent Leaks
Modern mixer taps operate using a different mechanical logic compared to the traditional compression taps discussed earlier. Instead of a rubber washer, these fixtures rely on two polished ceramic discs housed within a cartridge. These discs have precisely cut openings that align to control water flow and temperature. While these systems are designed for longevity, they eventually leak when grit or mineral deposits scratch the ceramic surfaces. Understanding how to fix a leaking tap of this variety requires a more technical approach, as the internal components are often brand-specific and non-serviceable, meaning the entire cartridge must be replaced.
Accessing the cartridge begins with locating the grub screw. This is usually hidden behind a small plastic indicator cap, often coloured red and blue to signify hot and cold. Once you remove this cap with a small flat-head screwdriver, you can use an Allen key to loosen the grub screw and lift off the handle. You are then faced with what we call the "match-up" challenge. Unlike standard washers, mixer cartridges come in dozens of variations regarding height, width, and lug placement. We strongly advise taking your old cartridge to the hardware store to ensure an exact match. Buying the wrong part is a common source of frustration for DIY homeowners.
Mixer Tap Cartridge Replacement
After removing the handle, you will see a decorative dome cover followed by a large brass retaining nut. Use your shifter to unscrew this nut, taking care not to slip and damage the chrome finish. Once the old cartridge is removed, clean the inside of the tap body with a cloth to remove any debris. When inserting the new unit, ensure the lugs on the base of the cartridge align perfectly with the corresponding holes in the tap body. A common error is over-tightening the brass retaining nut during reassembly. Applying excessive force can crack the delicate ceramic discs, leading to an immediate failure of the new part.
Dealing with Leaking Spouts
If water is pooling at the base of your kitchen or laundry mixer, the issue is likely the swivel spout seals rather than the cartridge. These seals, often referred to as V-seals or O-rings, sit between the spout and the main body. Removing a seized spout requires patience; a gentle back-and-forth motion with a food-grade lubricant can help free it without scratching the metal. Persistent leaks can also be caused by external factors. For instance, a blocked drain in Ballina or surrounding areas can cause back-pressure in the system, forcing water out through the weakest seals in your tapware. If the leak persists after you have replaced the seals, it may indicate a broader plumbing issue. For a professional assessment and a guaranteed resolution, you can book a licensed Northern Rivers plumber to inspect your system.
When DIY Isn’t Enough: Calling a Northern Rivers Professional
While understanding how to fix a leaking tap is a practical skill for any homeowner, some situations exceed the scope of basic maintenance. High water pressure is a common issue across Northern NSW and often acts as a silent killer for household plumbing. If your mains pressure exceeds the Australian standard of 500kPa, it places constant stress on every seal, joint, and appliance hose in your home. In these instances, the instructions on how to fix a leaking tap won't solve the recurring problem because the underlying systemic pressure remains too high. A professional can install a pressure-limiting valve at your meter to protect your entire property.
Attempting a repair without the correct technical knowledge carries specific risks that many DIY guides overlook. A simple washer replacement can quickly escalate if a thread is stripped or a pipe is fractured within the wall cavity during disassembly. Beyond the immediate physical damage, there is a significant regulatory risk. In Australia, unlicensed plumbing work can lead to the denial of home insurance claims if a major water damage event occurs later. Engaging a professional ensures that all work is compliant with local standards and provides you with a clear record of maintenance for insurance purposes.
Signs You Need a Licensed Plumber
You should stop the DIY process and seek professional assistance if you encounter any of the following technical challenges:
- Water Hammer: If you hear loud banging noises in the pipes when you turn a tap off, this indicates a pressure or resonance issue that a simple washer won't fix.
- Seized Headworks: When a tap bonnet refuses to budge with standard tools, applying excessive force can snap the pipework behind the wall.
- Hidden Moisture: If you notice dampness inside the vanity cabinet or water staining on the wall behind the tap, the leak is likely originating from a breach in the breech or a failed connection rather than the tap spindle.
The Graywater Difference
We pride ourselves on a disciplined and systematic approach to every service call. Our business model is built on radical transparency, utilising a structure of time-based labour and cost-plus materials. This ensures you only pay for the actual work performed and the specific parts required for your repair, fostering a relationship built on trust rather than high-margin transactions. We view professional maintenance as a preventative investment that extends the lifespan of your fixtures and prevents the stress of service emergencies.
Our team possesses specialised knowledge of Northern NSW plumbing standards and regional compliance requirements. For those moments when a DIY attempt doesn't go as planned, we provide a reliable emergency plumber Yamba service to stabilise your system and prevent further property damage. We value craftsmanship and direct communication, ensuring you understand the nature of the problem and the method of resolution before any work begins.
Secure Your Home Against Water Waste
Mastering the steps of how to fix a leaking tap is a practical way to manage your household budget and protect your property's infrastructure. By accurately identifying your tapware and performing methodical maintenance like valve reseating, you can resolve most minor drips before they escalate into costly emergencies. This disciplined approach not only saves water but also prevents the long-term degradation of your bathroom and kitchen fixtures.
If you encounter seized components, hidden leaks, or signs of high water pressure, relying on professional expertise is a pragmatic decision. We provide a 24/7 emergency service across the Northern Rivers, prioritising honesty through our transparent, time-based labour and cost-plus materials pricing. Our licensed NSW plumbing specialists ensure all repairs meet local compliance standards, giving you confidence in the quality of your home's plumbing. For a reliable and permanent resolution to persistent leaks, you can Book a Professional Tap Repair with Graywater Plumbing. Taking a proactive approach to your property maintenance ensures long-term reliability and peace of mind for your household.
Frequently Asked Questions
How do I know if my tap needs a new washer or a new cartridge?
Identify the handle operation first. Traditional taps with separate hot and cold handles that rotate fully use rubber or foam washers. Modern single-lever mixers utilise a ceramic disc cartridge. If you are learning how to fix a leaking tap, checking the handle's range of motion is the first step in determining which replacement part to purchase at the local hardware store.
Can I fix a leaking tap without turning off the water mains?
You cannot safely perform this repair without isolating the water supply at the main meter. Attempting to dismantle the tapware while the system is under pressure will result in immediate flooding and potential injury. Always turn the meter valve clockwise and open the tap to drain residual water before you begin any work on the internal components.
Why is my tap still dripping after I replaced the washer?
A persistent drip after a washer change usually indicates a pitted or corroded valve seat. If the brass surface where the washer sits isn't perfectly smooth, water will continue to bypass the seal. You will need to use a specialised reseating tool to grind the seat flat. This ensures the new jumper valve can create a watertight connection against the metal surface.
Is it legal to fix my own leaking tap in New South Wales?
NSW legislation allows homeowners to perform basic maintenance such as replacing tap washers, O-rings, and jumper valves. However, any work involving the modification of pipework or the installation of new fixtures must be completed by a licensed professional. This ensures your home remains compliant with Australian standards and protects your eligibility for insurance coverage if water damage occurs.
What is water hammer and can it cause my taps to leak?
Water hammer is a pressure surge that occurs when the flow of water is suddenly stopped or changes direction. This creates a physical shockwave that causes pipes to vibrate or bang against wall studs. These vibrations weaken washers and O-rings over time, leading to recurring leaks. Installing a pressure-limiting valve is often the most effective way to resolve this systemic issue and protect your tapware.
How much does it typically cost to have a professional fix a leaking tap?
Professional costs are determined by a combination of a call-out fee and the time required for the repair. Most licensed plumbers charge an initial fee that covers a set period of labour and travel. The final cost also includes the price of materials used, such as specialised cartridges or reseating services. We maintain a transparent fee structure based on time and materials to ensure clarity for our clients.
How often should I replace the washers in my home taps?
We recommend replacing your tap washers every two to five years as a form of proactive maintenance. The exact lifespan depends on the mineral content of your local water and the frequency of use. Replacing these components before they fail prevents damage to the valve seat. It also reduces the likelihood of an urgent plumbing emergency during the night.
What should I do if the tap spindle is seized and won't turn?
If a spindle is seized, you can try applying a small amount of penetrating lubricant or food-grade silicone grease to the threads. Allow it to sit for several minutes before attempting to turn it again with a shifter. If the component remains stuck, do not apply excessive force. Forcing a seized spindle can snap the internal pipework, which results in a much larger repair job.